Arroz Con Pollo

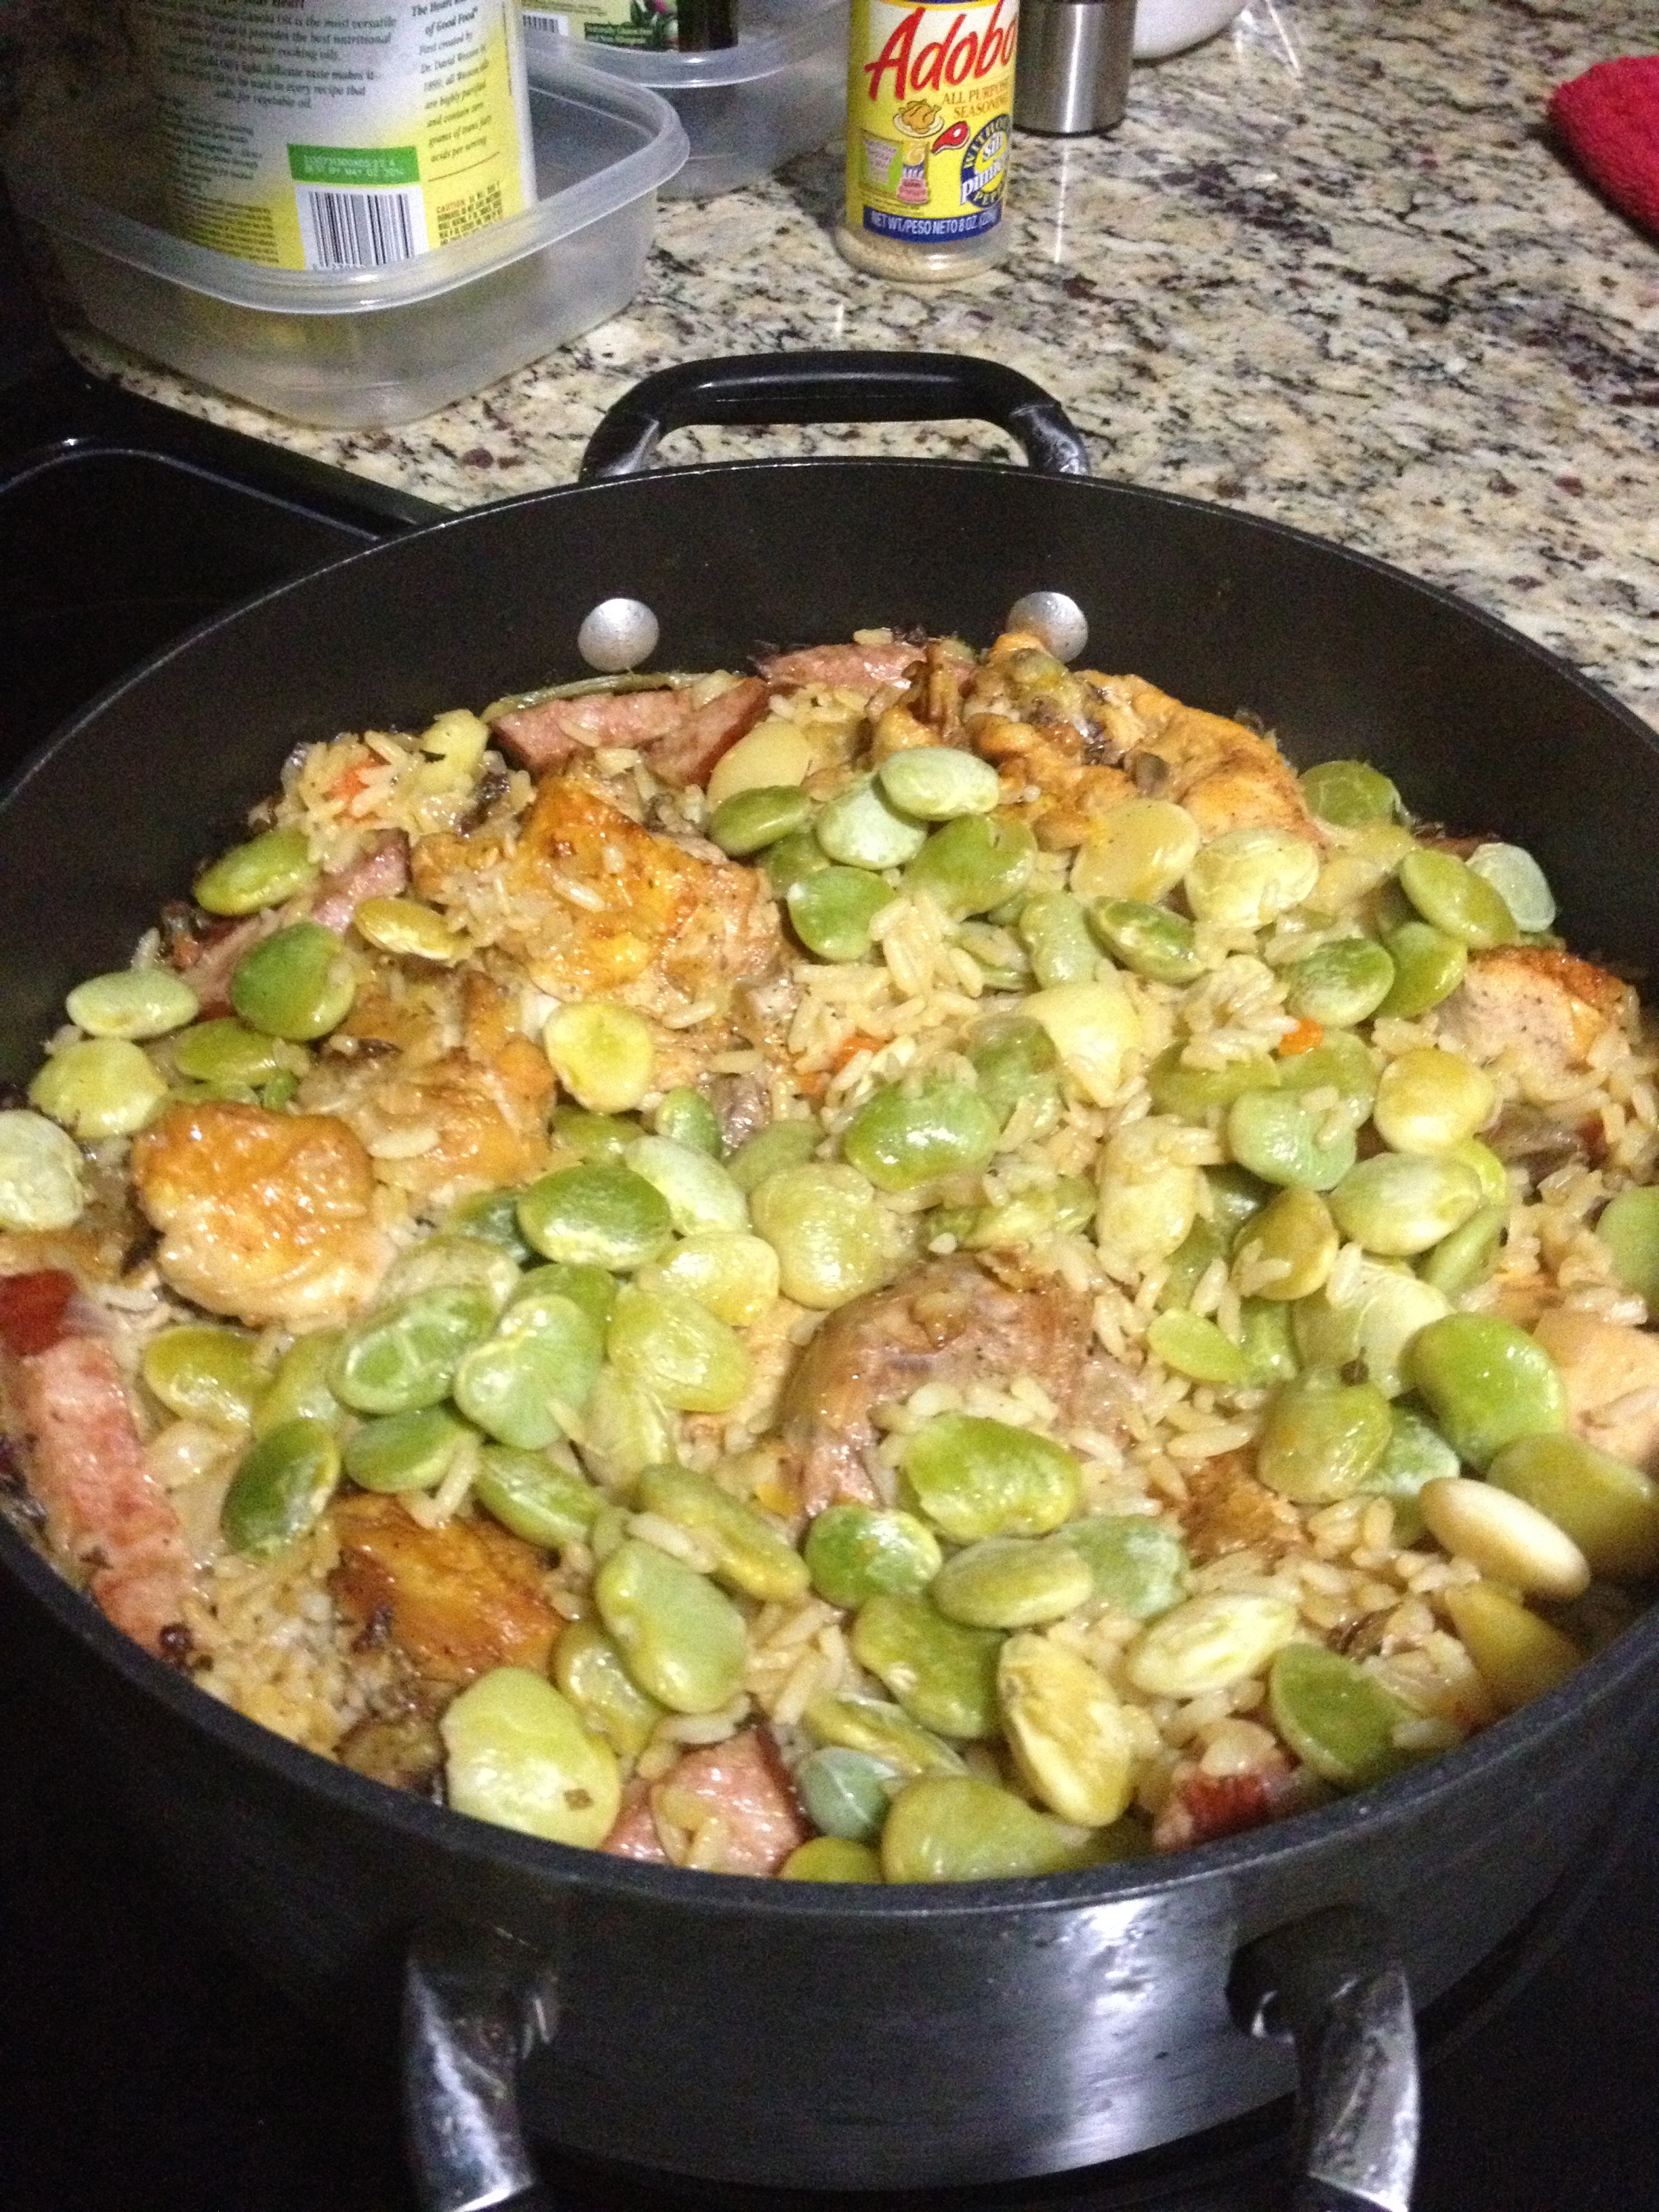
Arroz con pollo is a big hit in our house.  If you’re Latin or grew up around Latin people, you know what a wonderful bit of comfort food this dish is.  I’m not sure my recipe is all that authentic, but it’s pretty good, and makes for an easy one pot meal.  A more traditional arroz con pollo would use a Spanish style short grained rice, which I have used to great effect.  I also like using parboiled converted rice too (Uncle Ben’s brand), as it will also yield nice separate grains (if you’re into that), and give a nice “pega” (explained below).


Arroz Con Pollo

Ingredients:

2 Cups of rice (thoroughly rinsed until water runs clear)
1 small onion, diced
3 cloves of garlic minced
3 carrots diced
1 whole chicken cut up (or use chicken parts, I often just put legs and thighs in there) with skin
1 package frozen peas or lima beans
1 28 oz carton of low sodium chicken stock
1 packet Sazon (with saffron), or even better 1 bunch of saffron threads bloomed in 1/4 cup hot water, or a couple of teaspoons of tumeric
1 bottle of lager style beer (optional), if not add a little water
olive oil for frying
salt and pepper to taste

Method:

In large pot, heat pan to medium high heat.  Add olive oil, and brown chicken pieces (be careful not to crowd the pan) to a nice golden brown.  Remove chicken pieces.  Add a bit more oil and add carrot and onion.  Saute for a few minutes to soften, and be sure to scrape the fond (brown bits) from the bottom of the pan, created by the chicken.  Add garlic and stir until fragrant.  Add rice and coat rice with oil.  Add sazon (or bloomed saffron or tumeric) and liquid (beer and stock or stock and water).  Add chicken and peas. Bring pot to a boil, and reduce to a simmer. Cover and cook until water is absorbed and rice is cooked.

If you’re using a good heavy or non stick pot, be sure to keep the rice on the heat for maybe 8 or 10 minutes after it’s done so you can get a nice “pega.”  Pega is the Spanish word for crunch rice that forms at the bottom of the rice pot. If you use low enough heat you can get a wonderful beautiful crust on the bottom.  It’s much easier to accomplish with the par boil riced as it’s lower in starch, but you can do it with other rice.

IMG_2573 IMG_2574

Old friend. Old twist.

Lasagna begins with good preparation

Lasagna begins with good preparation

Recently the Miami New Times posted an article about a local pasta shop which is about a mile away from my house called Mr. Pasta.  My wife and I were intrigued by this spot and we wanted to try out some of their fresh made pasta to make at home.  I thought long and hard about what I would make and two dishes came to mind. The first was a pasta with a beef sugo, which I never cooked before.  The second was a lasagna using the fresh pasta sheets (I have never used fresh pasta in lasagna before).  After weighing which option to pursue, I just decided to combine the two.  It worked out great.

Beef Sugo Lasagna

Ingredients:
2-3 lbs of chuck roast
bunch fresh herbs (I used oregano and parsley)
1 onion
3 cloves of garlic
3 tbs of tomato paste
1 14 oz can of beef broth
1 cup of marsala wine
1 jar of preferred marinara sauce
16 oz of Whole Milk Ricotta
2 eggs
2 large fresh pasta sheets from Mr. Pasta or some other kick ass purveyor of fine fresh pasta
mixture of fresh mushrooms (oyster, shitake, cremini)
4 -5 tbs of grated parmesan cheese
1 ball of mozzarella di bufala (or fior di latte)
olive oil
salt and pepper to taste

Method:
In a pressure cooker combine the first eight ingredients along with salt and pepper to taste (if you are feeling like an overachiever you can sear the meat first, but I did not do this), and bring to a boil.  Place pressure cooker lid and cook at high pressure for 60 minutes, allowing the pot to cool and employing the natural release method.  Remove meat from pot and shred with fork. Set aside.

Heat a medium skillet to medium high and saute mushrooms in olive oil and cook to a golden brown.  Season with salt and pepper and set aside.

In a medium bowl.   Place ricotta in bowl along with eggs, parmesan, pepper, and a glug of olive oil.  Mix until mixture is uniform.

In a large pot, boil some water.  Cut Lasagna sheets into thirds (I had six smaller sheets and used two per layer) and place in boiling water.  Boil pasta for one minute and drain.  Pour cold water over the noodles. Preheat oven to 375 degrees.

In a 9 x 13 glass baking dish, place a few tablespoons of the jarred marinara and spread evenly on bottom of dish.  Place two lasagna sheets to cover bottom of dish.  Place half of ricotta mixture evenly across bottom layer of noodles.  Add the shredded beef and marinara.   Place second layer of pasta.  Add remaining ricotta.  Add mushroom mixture and marinara.  Add third layer of noodles.  Spoon marinara on top and top with torn pieces of mozzarella di bufala.

Tent the baking dish with tin foil and bake in 375 degree oven for 30 minutes with the cover on.  After 30 minutes, remove foil and bake uncovered until golden brown (30-45 minutes).  Remove the lasagna from heat and allow it to cool for about 20 minutes (lasagna should be warm, not molten hot).  Serve.

Brazilians Taking Over

It seems that the Brazilians are taking over everything in South Florida, including my blog! It’s not a bad thing though by any means, because Brazilians always bring great meat with them whenever they come over! If you haven’t been to a Brazilian barbecue, you are missing out.  Brazil easily has one of the best grilling traditions in Latin America (and that’s saying something).  One of their prized cuts is the picanha (aka top sirloin, aka coulotte, aka cap steak), a cut we don’t really eat much here in America.

Picanha prior to grilling

Picanha prior to grilling

There is not much you need to do to this great cut.  It’s incredibly forgiving, because of the beautiful cap of fat on it, that will keep the meat juicy even if you cook it beyond medium.  I simply score it and season aggressively with salt and pepper.  In this preparation I also added slices of garlic, but that’s entirely optional.  Since the cut is so large (2.5 to about 6 pounds), it’s best to cook this massive steak through in direct heat.  Also as the fat cap tends to cause flare ups, in direct cooking is preferred if you don’t want to have your picanha burnt to a crisp.

It should be noted that Brazilians like to grill the whole picanha like a massive steak and then while the steak is on the grill they slice the rare steak in thick slices and then grill each slice individually.  Every time I see this done at a barbecue I can’t take it.  You’ve got to let the meat rest! I mean it still tastes pretty good, but I just can’t get over it.  I roast the picanha whole on the grill using the indirect heat method and allow it ample time to rest.  I do finish with the picanha by searing the fat side down on the hot side of the grill, just to crisp up some of the exterior fat (watch carefully because it will flare).  I think my version is infinitely better.

The Finished Andre Style Picanha

The Finished Andre Style Picanha

Brazilians usually serve their picanha with yucca flour and this pico de gallo style mixture.  I serve mine like I would any other steak.  Next time you are at your butcher ask for this cut, it’s underrated (in America).

Sunday Taco Fiesta: the aftermath

I’m notoriously bad about posting pics for a blog sequel, and this post is really no different. The tacos were a big success yesterday for our dinner with the new neighbor.  I was most happy with the carne asada.  As I posted yesterday, I used flank steak, and the marinade really helped make the meat tender and it really permeated the meat.  All the food was well received.  Everyone liked the salsas, and I think for the most part making salsas the day before are preferred, because the flavors have a chance to develop.

As for the preparation of the food.  I fired up the old weber with natural charcoal.  I wanted a real hot grill especially because I was working with wet marinated meat, which is harder to sear.  I started with the flank steak (because I knew the fish would stick some), and placed the steaks on the hottest part of the grill for about 2-3 minutes per side. I removed the steaks from the grill, and allowed them to rest covered in tin foil.  I then scraped down the grill and placed my corvina on there.  I basically just let it develop a crust on the first side, and just covered the grill to allow the fish to cook through.  I know my grates weren’t going to release the fish very easily (know thy grill), so I didn’t want an even bigger mess on my hands by trying to flip the fish.  Cook the fish 7-8 minutes, until just opaque.  Transfer fish to a tray (or serving bowl) and flake the fish with a fork. Be sure to scrap up the real crispy bits of fish from the grill (assuming your grill is clean that is!) and add that to the flaked fish.  It’ll give the fish a great texture, adding some crispness to the very moist flaked fish.

fire it up

fire it up

photo 2

the aftermath

We kept the garnishes really simply.  I had a bowls of finely chopped onion, and finely chopped cilantro ready, along with chopped tomato (just because I had a tomato), cotija cheese, lime wedges, and our salsas.  I also grilled the tortillas with my dying embers (natural charcoal while super hot, burns quick).  I also made some beans as a side. I just cooked the beans (soak the beans overnight) in a some unsalted chicken stock, water half an onion, pepper (no salt), garlic, and several lardons of salt pork.  I cooked them for about two hours until tender, and then seasoned the beans with cumin and Mexican oregano.  Should’ve taken a picture….


Sunday Taco Fiesta!

I understand that it’s Saturday, but it’s a rainy Saturday afternoon, so I thought I’d blog about the meal I’m preparing tomorrow.  My wife and I just had a new neighbor move in the house next door.  In the spirit of being neighborly we invited him (and our other neighbors on the other side) to dinner tomorrow.

I am feeling pretty lazy, so I thought I’d go with something easy and hit with everyone.  Tacos.  Of course, it started as a simple idea, but as I researched it, I realized the meal was a little more complex than I planned.  First order of business was deciding what type of tacos to make. After careful deliberation I decided to go with carne asada and fish tacos.

I did a lot of research on carne asada, and marinade recipes for it vary widely.  Furthermore, I wasn’t crazy about the carne asada recipes that were on my usual recipe reference sites (Epicurious, Food & Wine, and Saveur), so I just researched a ton of recipes, but my marinade basically came out to be:

  • onion
  • olive oil
  • lime juice
  • lemon juice
  • orange juice
  • cilantro
  • chives
  • ancho chile powder
  • new mexico chile powder
  • garlic
  • jalapeno
  • white wine vinegar
  • salt/pepper to taste

Obviously I have not included any measurements, I mean hey it’s just a marinade.  I just juiced on the citrus, sliced the onion and chopped the herbs and mixed it all up. I’m using some real beautiful flank steak my wife picked up from Costco ($8 per lb!)


IMG_2658

IMG_2660

Can’t wait to grill it tomorrow.  I’m still trying to figure out what I’m going to do with the fish.  I’ve got a gorgeous 2lb corvina filet.  I’m thinking just a little olive oil, citrus, and maybe some chile powder and cilantro, then a simple grill and flake.

This morning I also prepared the salsas for tomorrow.  I am doing a variation of this recipe from Saveur. I added a little bit of citrus, cilantro, honey (chiles are a little bitter), and green onion.  For a second salsa, I made an avocado salsa with one big Florida avocado, garlic, onion, cilantro, chives, lime juice, and water and pureed that until it was pretty loose (maybe 1.5 cups of water).  I figured it would be a nice accompaniment to the smokey, spicy salsa.  It would also go great with the fish tacos.

IMG_2662


IMG_2663


Duck!

It was my one year wedding anniversary yesterday (not why the post is called “Duck!” FYI).  To commemorate this glorious event, I made, which I think was the first time, roast duck.  Now I have made a couple of geese before (as I’ve posted about in the past), but this was my first time roasting a whole duck.  I will say the flavor of the finished product was spot on, but I didn’t get the perfect crispy skin you strive for.  I blame myself for two main reasons.  The first reason is that I didn’t prep the duck well enough in advance, and second I think the aromatics I stuffed the duck with (lemon and apple) created too much steam.

If you read my prior posts regarding the roast goose I made the past couple of Christmas holidays, you will see that the techniques for goose translate to duck.  As I had cited my lack of prep, here I didn’t get the opportunity to put the duck in the fridge (to dry) after pouring boiling water on it to tighten the skin.  Making sure the skin is really dry is the  (ask the Chinese when they make their peking duck) most crucial step for crispy skin.  I thought I could get around this by cooking the duck on the grill using indirect cooking, but it didn’t quite work.

iphone 087

Be sure to have a pan for catching the drippings

iphone 088

Not crispy, but delicious

iphone 090


I don’t want to sound wholly negative. The flavor of the duck was excellent, and the company even better.  Still a tremendous anniversary.


Catholic Guilt

This past Good Friday I was adamant that we eat no meat that day.  It must’ve been all those years of Catholic guilt and watching the ‘Bible’ mini-series on the History Channel.

On that Good Friday, luckily my office was closed, so I had the chance to prepare some good food.  My mother in law was also in town, so it was a special occasion.  I made some salmon and tuna nigiri (I have a bunch of older sushi making posts if you need some recipes).  I also made quick sashimi of salmon and halibut, which I prepared with olive oil, sesame oil, scallion, cilantro, sesame seeds, and ponzu.

iphone 070

For dinner we had some pasta with bottarga and some roasted branzino. Very clutch. I think Father Jim would be rather proud of me.

iphone 069 iphone 071

The Old War Horse

Classical musicians have a term for works they perform over and over again reliably.  Those works are called “war horses.” The piece you can play when someone tells you that you have only a week to prepare for the performances.  I am not much of a violinist, but one of my war horses from a cooking standpoint, is the leg of lamb.  I love making it, and it’s super easy.

You can season it however you’d like, but I usually just use a variation of this recipe’s marinade/rub:

http://chocolateandzucchini.com/archives/2009/09/slow-roasted_shoulder_of_lamb_rubbed_with_rosemary_anchovy_and_lemon_zest.php

I’ve even made that recipe on this blog before.  However for this past Easter I made a massive 8lb leg of lamb, which I marinaded in the rosemary anchovy rub (minus the balsamic pretty much) and grilled on my Weber (I’m a big big griller).

When I make a large cut of meat on the grill I use Weber fuel holders. The fuel holders ingeniously keep the coals to either side of the grill, allowing for a cool spot in the middle of the grill for indirect cooking. They look like this:

413Y8RRKSKL._SX355_


It’s amazing how efficiently they cook the meat. In fact it’s almost too efficient.  My 8lb leg of lamb cooked in less than 2 hours, and wasn’t quite as rosy as I’d like.  I’d have reduced the cook time by about 20 minutes.  I prefer this method over the oven because I don’t have to dirty my kitchen (which my wife loves); it doesn’t heat the house up; and most importantly, the meat is imparted with a great smoky grilled flavor.

iphone 074


Unusually Usual

Anyone who knows me knows that I hate to be trendy, but as far as food trends go, I’m all in on the offal or nose to tail cooking movement championed by chefs such as Feargus Henderson, Chris Consentino, and Andrew Zimmern.  What’s not to like?  I mean we’re always going to have steaks and pork chops and chicken breast, but there are some great alternative protein sources out there that are 1) readily available; 2) very affordable (for now); and 3) even very healthy.

One such alternative food source that I love to make at home is beef heart.  Beef heart is super lean, very rich (almost livery, but inherently very beefy), tender, and surprisingly forgiving when cooked (especially considering how lean it is).  Very recently I had my neighbors over for dinner, and the husband, a somewhat picky eater (when it comes to offal or non-traditional meats, but a pretty adventurous eater otherwise), really enjoyed the beef heart I prepared (though we told him it was beef heart after he had several bites).

Since the meat is rather lean, I like to give it a marinade, usually with olive oil, garlic, herbs, and maybe a little acid. In my most recent preparation of beef heart (prepared on a weeknight after work), I prepared a quick paste of olive oil, garlic powder, salt, pepper, Mexican oregano, and ground pasilla and New Mexico chiles.  I then grilled the massive beef heart (3-4lbs) on my weber kettle by searing on the hot part of the grill, and then cooking with indirect heat, covered for about 15 minutes.  After I let the heart rest I served it with roasted sweet potatoes and sauteed onions and peppers.


Image


before


Image


after

The meal couldn’t be easier, and while people don’t eat beef hearts that often (yet), I always find them at my local Publix for about a $1.00 per pound (for now).  That’s unbelievable value for such high quality protein, and you are not sacrificing anything in the taste department.  Also a quick check on the internet tells me that beef heart only has 127 calories and 4g of fat for a 4oz serving.  That beats the hell out of bland and boring bonless, skinless, and mostly tasteless chicken breast.

Yakitori

It’s been another long hiatus from the blogosphere.  It has been a ver busy end to 2012 for me, but I fee bad for not blogging for the past several months.  I have been cooking a lot still, and taken a lot of pictures.  I will be catching up a bit on the posts for this this three day weekend.  I’m going to start out with a meal I’m making tomorrow for some good friends who are in town from NY.

These good friends were the inspiration for this meal, because the last time I saw them in NY they took me to an amazing yakitori joint in NYC called Soba Totto.  In my opinion yakitori cooking is just about the perfect meal.  First of all, it’s all protein, which is good because like everyone else, I’m trying to trim up for the new year.  Second, it’s incredibly savory.  The combination of salty and sweet just go perfect with wine or beer.

I had attempted some yakitori skewers before, and they were pretty good actually.  I used a mixture of soy sauce, mirin, sugar, and some ginger and garlic.  I marinated the skewers (my favorite yakitori to make was pork belly and scallion) in this mixture and then grilled them.  While good, I did some research (and bought a japanese grilling cookbook for my ipad) and realized that my version wasn’t authentic.  Real yakitori, apparently is all about the “tare.”  The classic yakitori sauce which is much richer and more unctuous than my version and it includes broiled chicken bones (I used some chicken backs and thigh bones), and is reduced to concentrate the flavors.

My research led me to the following tare recipe:

  • Bones from 1 chicken (I used saved chicken backs and the thigh bones from the chicken yakitori I’m going to make).
  • 2 cups mirin
  • 2 cups soy sauce
  • 1 cup sake
  • 1 cup water
  • 2 tbs brown sugar
  • 1 bunch of scallions, optional
  • 1 thumb sized piece of ginger, sliced, optional
  • 5 cloves garlic, optional
  • black pepper to taste

Method:  Preheat broiler; Broil bones (with some meat and skin) for 5 minutes. Add bones to remainder of in stock pot and bring to a boil.  Reduce to simmer (skim off the scum that rises to the surface), and simmer until reduced.  Strain out solids and save tare for grilling.

In preparation for tomorrow’s grilling, I prepped the tare, another marinade for beef (garlic, soy sauce, olive oil, pepper), and all my yakitori skewers.  I am making chicken (made from thigh meat), chicken necks, chicken skin, chicken heart yakitori, and assorted vegetable skewers.  I’m also going to grill some steaks, which I’ll marinade in the garlic soy and slice for my guests.  Hopefully the grilling will go off without a hitch.